

LinkExchange Member
The following is how to get to DALNet #newbies using mIRC:
Okay, so, you have an account with an Internet Service Provider (ISP) or you wouldn't be here, and you now want to get on IRC and visit DALNet #newbies so you can get started on becoming an IRC addict.
You have Windows 3.1 or Windows 95 and you would like to use the IRC client mIRC. If you have Windows 3.1 you will need to download mIRC 5.02 16 bit or for Windows 95 mIRC 5.02 32 bit
Once you have downloaded a copy of mIRC from one of the above links you now need to install it on you system. To do so, find the file on your hard drive and just double click it with your mouse to start the installation program. If of course you have mIRC installed on your computer you need not continue with this part of the help page.
The installation program for mIRC is rather uncomplicated and straightforward. Just take the default options and mIRC will be installed to your hard drive in the C:\mirc folder or directory. Once this has been accomplished, run mIRC with the icon that the setup program placed on your computer.
When you run mIRC for the first time you will be prompted to input some information before the program can connect to a IRCserver. The following screen shots are provided to illustrate the information you need to provide.
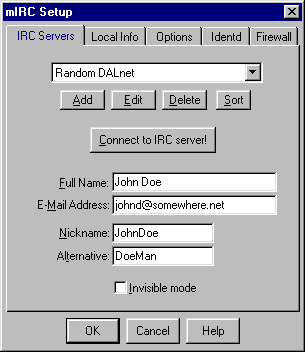 |
In this box you need to provide four pieces of information, and make one optional choice. Fill in the value for Full Name, note this does not have to be your real name. Next fill in the E-mail Address, once again this does not have to be real. Now provide a Primary and Secondary Nickname for yourself. Last but not least, if you wish to be invisible to people that do not know your exact nickname, check the Invisible Mode checkbox. |
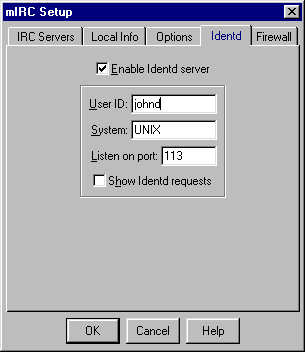 |
In this box you will need to put in your Username that you log onto your ISP as. Also to ensure that DALnet servers properly identify you, check the checkbox entitled Enable Identd Server. Once you have completed this, you are ready to connect to DALnet. Click the OK button to save your configuration changes and you will be left back at the mIRC main screen. |
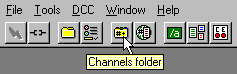 |
Once connected to DALnet, the Channels Folder should popup if this is a new install of mIRC. If not, you can click the toolbar button as indicated on the left. |
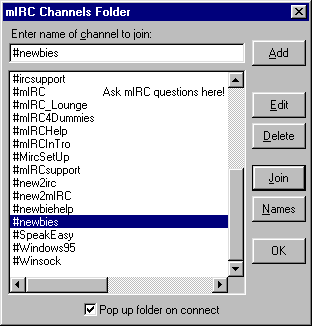 |
To connect to DALnet Channel #newbies, you can either, type #newbies in the (Enter name of channel to join) edit box and hit the Join button. You can scroll the list of channels until you find #newbies, and then highlight it and click the Join button. You can scroll to the Channels Folder listbox for #newbies and simply double mouse click #newbies. Or if all else fails, you can simply type /join #newbies in your status window. |
help you learn about IRC.
This concludes how to get onto DALnet #newbies with mIRC. If you have any problems connecting, or once you get onto IRC, please email me or /msg ShyGuy help me please! Have a good day.
Michael Jenkins
ShyGuy
©Copyright notice